
Last updated: 10-26-19
I suggested in a previous article that Zhu Bajie was first added to the Journey to the West story cycle during the 14th-century. This is because the character does not appear in the 13th-century version of the story, but he does appear in a stage play from the 15th-century. Thanks to the writing of Prof. Ben Brose, I learned of Pigsy’s three earliest known depictions from this time period. The first is a Yuan Dynasty Cizhou ware ceramic pillow showing all of the characters (fig. 1). The second is a fragmented Yuan-era blue and white incense burner (fig. 2). Older still are Zhu’s depictions appearing on the 14th-century Gyeongcheonsa pagoda (Kyŏngch’ŏnsa sipch’ŭng sŏkt’ap, 경천사십층석탑) from Korea (fig. 3). You read that right, Korea!

Fig. 1 – The Cizhou ware pillow featuring Pigsy and the other pilgrims (larger version); Fig. 2 – A fragment of the blue and white incense burner showing Pigsy leading the White Dragon Horse (larger version). Fragments with the other characters can be found here; Fig. 3 – The Gyeongcheonsa pagoda is now housed inside of the National Museum of Korea (larger version).
I. Why Korea?
The Pak t’ongsa ŏnhae (Ch: 朴通事諺解, Pu tongshi yanjie), a 17th-century Korean primer on colloquial Chinese comprised mostly of material traceable to the mid-15th-century, presents the Journey to the West story cycle as a highly popular tale among Koreans. This fact is revealed during a conversation between two Buddhist monks, one of which states: “The Xiyouji is lively. It is good reading when you are feeling gloomy” (Dudbridge, 1970, p. 180). The same monk then recounts an episode where Monkey competes with three animal spirits-cum-Daoist priests in a test of magic skill. This episode comprises chapters 44 to 46 in the final Ming version of the novel. [1] The popularity of the Chinese story cycle in Korea then explains why scenes from it appear on the pagoda.
II. Pagoda Background
The National Museum of Korea explains the 13.5 meter (44.3 ft) tower has a long and tumultuous history:
Made of marble, this ten-story stone pagoda was erected at Gyeongcheonsa Temple in Gaeseong in 1348, the fourth year of the reign of Goryeo’s King Chungmok. The first tier of the pagoda bears an inscription that records various details about the pagoda’s production, including the production date and the patrons. According to the inscription, the pagoda was sponsored by Goryeo people who were associated with China’s Yuan Dynasty. Notably, this stone pagoda was closely modeled after wooden architecture, and each story is expertly carved with Buddhist images. The platform is sculpted with scenes of Xiyouji (Journey to the West), as well as lions, dragons, and lotus flowers. The lower four stories are sculpted with scenes of Buddha’s Assembly, while the upper six stories are sculpted with images of Buddha with both hands clasped. The four sides of the platform and those of the lower three tiers are protruding, recalling the shape of Tibetan-Mongolian pagodas that were prevalent in the Yuan period. However, the upper seven tiers have a more standard rectangular shape that corresponds with the conventional form of stone pagodas. Notably, about 120 years after this pagoda was built, the Joseon royal court erected a stone pagoda with a similar material and shape at Wongaksa Temple in Gwangju. In 1907, this pagoda was illegally dismantled and smuggled to Japan by Tanaka Mitsuyaki, the Japanese Minister of the Imperial Household. However, thanks in part to the efforts of a British journalist named Ernest Thomas Bethel and an American journalist named Homer Hulbert, it was returned to Korea in 1918. The pagoda was partially restored in 1960, while it was being kept at Gyeongbokgung Palace, but after having been kept outside for so long, suffering the effects of weather and acid rain, it could not be properly preserved. Thus, in 1995, it was dismantled for a more extensive restoration project. Ten years later, it was reassembled inside the new building of the National Museum of Korea in Yongsan, being unveiled as part of the museum’s grand opening in 2005 (“Ten-story Stone Pagoda”, n.d.).
The pagoda’s political and architectural connections to Yuan China further explain why scenes from the story cycle grace the platform.
III. The Images
(Note: I have recently learned that the line drawings from Yegŭrin Kŏnchʻuksa Samuso (1993) are all but useless. See the 10-26-19 update below for more info.)
Twenty Journey to the West-related scenes appear on the second level of the pagoda’s multifaceted three-tiered base. The following line drawings, which are based on ink rubbings of the original carvings, come from an in-depth field report by the Yegŭrin Architectural Firm (Yegŭrin Kŏnchʻuksa Samuso, 1993). The images are presented below starting from the southernmost face (the six o’clock position) of the pagoda’s diamond-shaped cross section, proceeding in a clockwise fashion. Each is accompanied with commentary from the original report.[2] You will notice the report is generally vague as the exact meaning of the scenes are often unclear. I will therefore present my own commentary or questions below in the hopes of furthering the discussion.
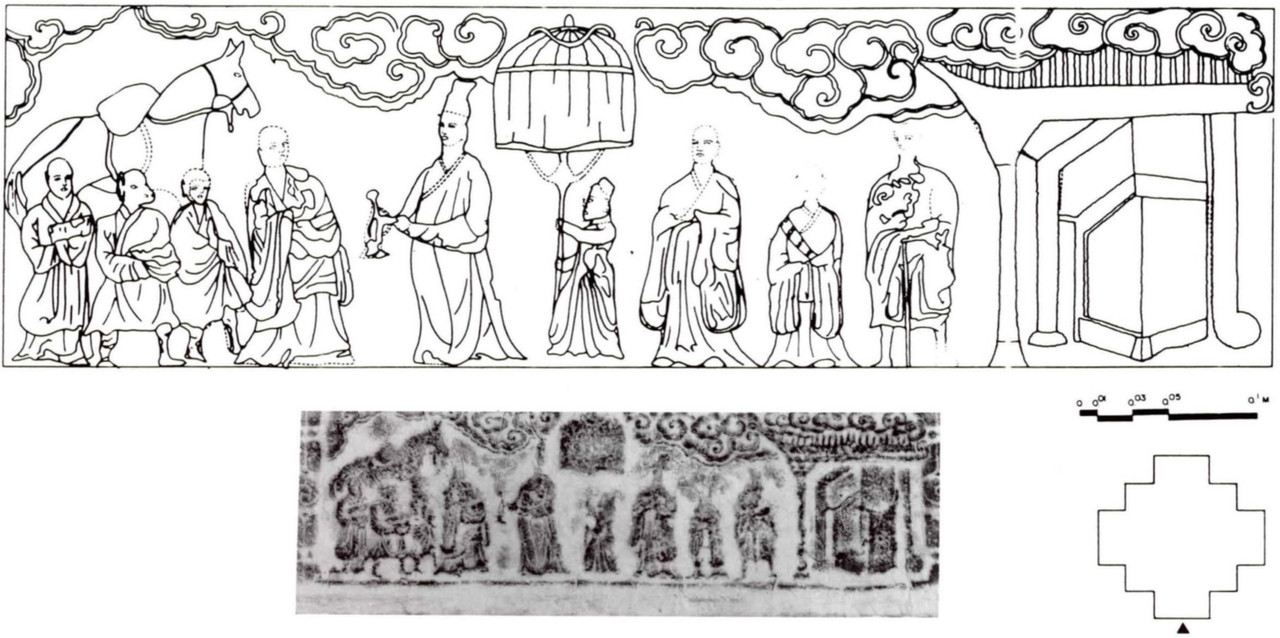
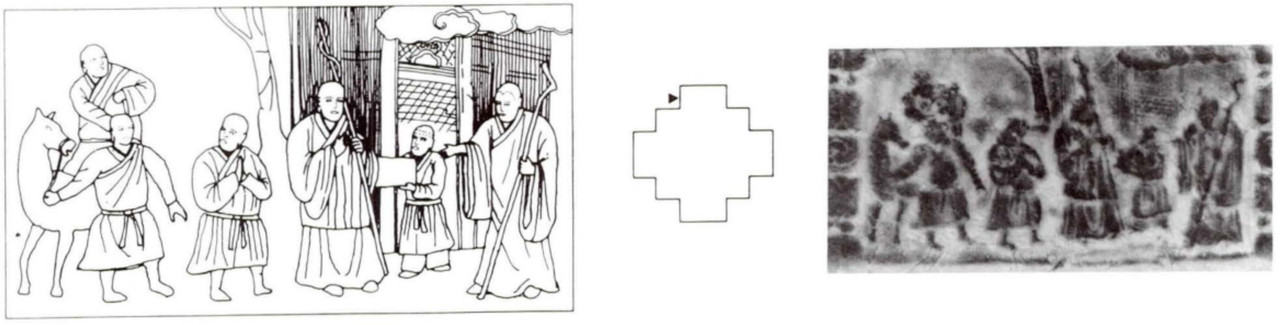
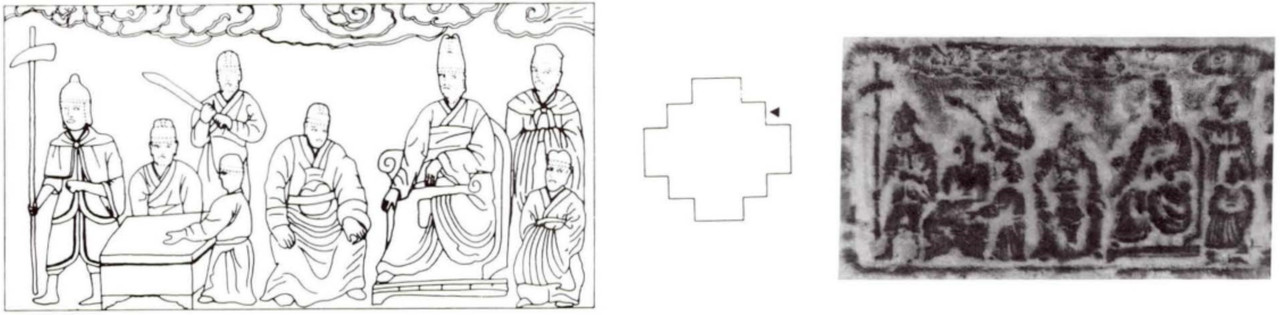
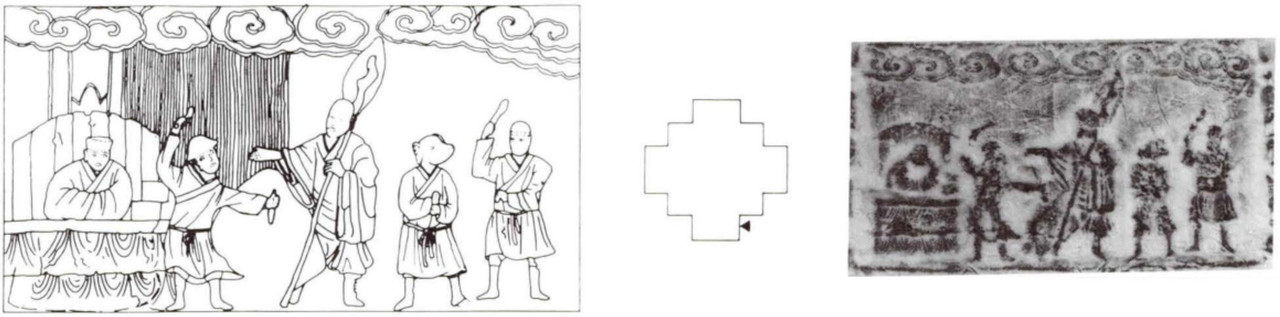
Number One: A royal send off

Fig. 5 – (larger version)
On the left, a figure of a Buddhist monk stands at the front, and behind him a horse and figures in the shape of a pig’s head, a monkey, and more are depicted. The figure of the Buddhist monk appears to be Monk Xuanzang, the figure of the monkey, Sun Wukong, the figure with the pig’s head, Zhu Bajie, and the last figure appears to be Sha Wujing. In other words, it is Monk Xuanzang’s travel companions. On the right, pictured symmetrically with Xuanzang’s travel party is the figure of a nobleman wearing a crown, and behind him stands a figure of a young boy holding an umbrella over his head and the figures of three noblemen.
And to the right of this a building structure is depicted. The nobleman who is at the very front wearing a crown seems to be a king and the building structure appears to represent a palace. Therefore, the content of the carving above seems to be the scene of a king sending off Monk Xuanzang’s travel party [fig. 5] (Yegŭrin Kŏnchʻuksa Samuso, 1993, p.123).
Could this scene be a telescopic version of the narrative, one in which the already assembled group is being sent off by Tang Taizong? After all, the authors suggest in panel number ten that the first ten images likely show the journey to India, while the latter half shows the return (Yegŭrin Kŏnchʻuksa Samuso, 1993, p. 124). Hierarchy in scale is employed to portray the king as the largest and therefore the most important, with Tripitaka being the second tallest/important, and the three disciples even shorter. Pigsy’s porcine head really stands out as Sandy is depicted as a human monk.
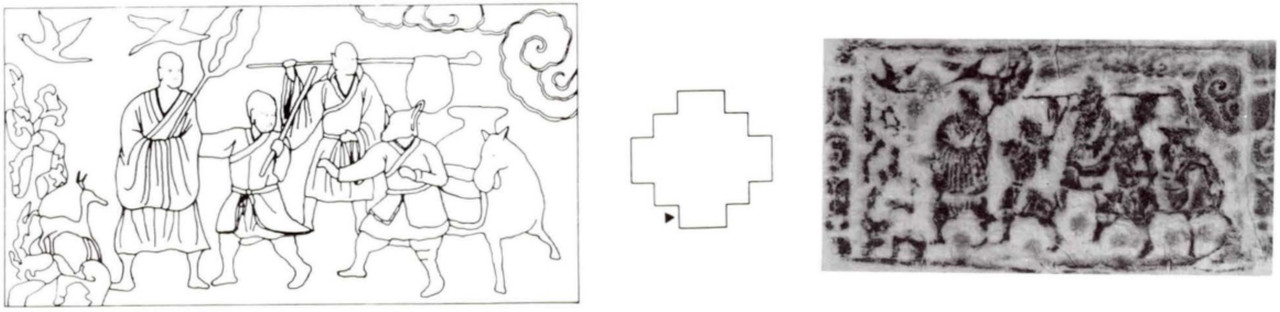
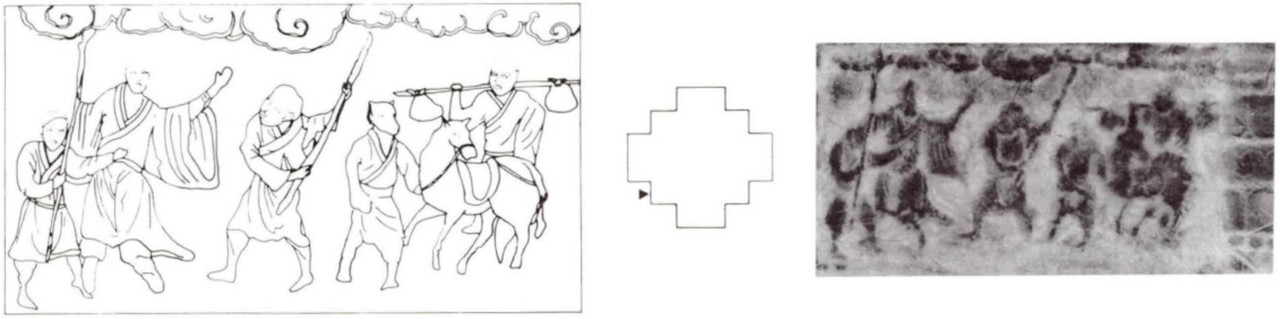
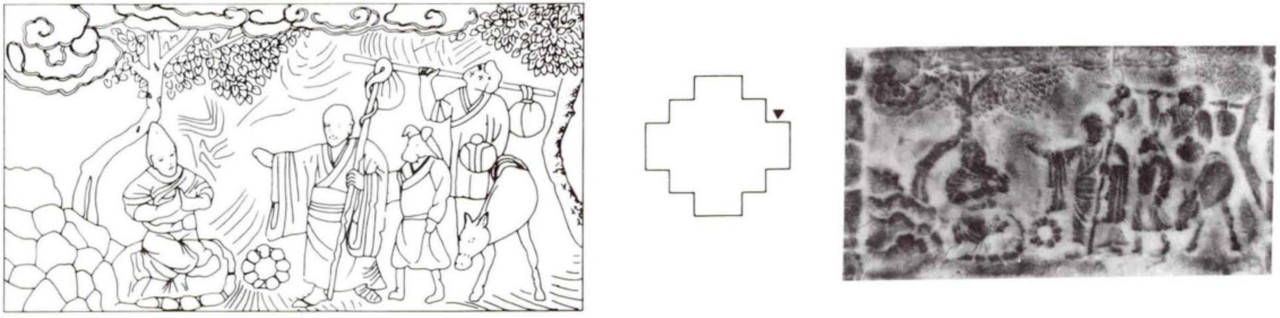
Number Two: On the Road

Fig. 6 – (larger version)
As above, the horse and the travel party of Monk Xuanzang, Monkey, Zhu Bajie and Sha Wujing have been portrayed. Here Sha Wujing is carrying a knapsack. On the left a road populated with animals and birds are depicted. Therefore, here it appears to show that Monk Xuanzang and his companions are traveling on a mountain road [fig. 6] (Yegŭrin Kŏnchʻuksa Samuso, 1993, p.123).
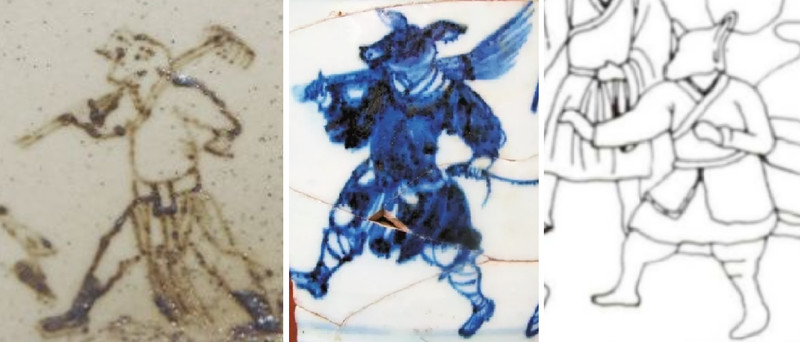
Take note of Pigsy’s upraised hands and wide stride. This motif appears several more times on other panels (fig. 12, 13, 17, and 24). The posture is quite similar to that from the aforementioned ceramic pillow and incense burner, which depict Pigsy carrying his rake and leading the horse. He lacks his signature weapon in these scenes, however (fig. 7). This might explain the strange posture of his right hand.

Fig. 7 – Similar Pigsy iconography from the Cizhou ware pillow (left), the incense burner (center), and panel two (right), all corresponding with the Yuan Dynasty (larger version). See also figure 24 for a better match.
Number Three: A prisoner?

Fig. 8 – (larger version)
On the left, the figure of a nobleman wearing a crown is kneeling. Behind him, a figure of a person holding a club appears to threaten the nobleman in front. Behind them something like an altar is depicted. Symmetrical with the figure of the kneeling nobleman, a figure looking like a government official from a prison in a provincial district stands holding a tool of torture.
Even if we don’t know what this is, it seems to show the oppression by those of other religions during the years of Xuanzang’s journey [fig. 8] (Yegŭrin Kŏnchʻuksa Samuso, 1993, p. 123).
My view on the scene differs from the authors. The “government official” appears to be a deity (noted by the flowing ribbons around the shoulders), possibly Guanyin since the upheld item reminds me of her holy vase. The figure to the right could be her disciple Moksha. Would this make the club-wielding figure Monkey and his prisoner a captured demon?
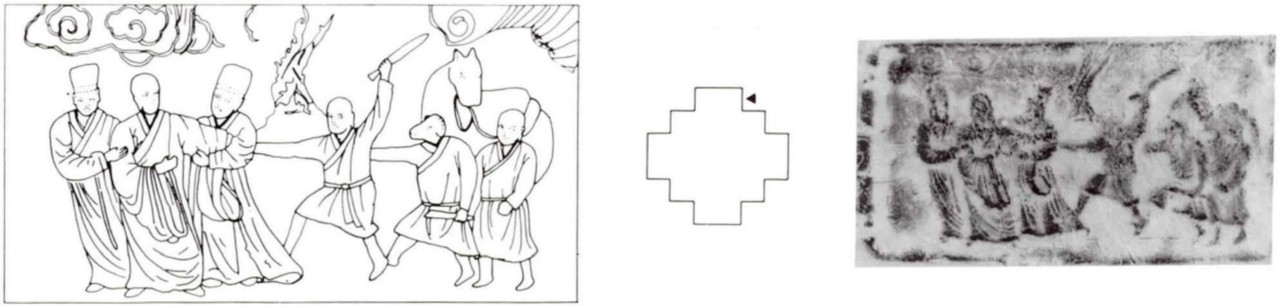
Number Four: A confrontation

Fig. 9 – (larger version)
On the left, a figure holding a club and Monk Xuanzang are depicted. On the right, Monkey, Zhu Bajie and Sha Wujing are portrayed. Here Monkey is posed as if he is defeating something with the stick, and behind the horse Sha Wujing is carrying the knapsack. Monk Xuanzang is shown lifting his left hand as if he is arguing something. This appears to show the scene of Xuanzang’s companions defeating some hindrance [fig. 9] (Yegŭrin Kŏnchʻuksa Samuso, 1993, p. 123).
I believe Tripitaka is begging Monkey not to slay or beat the person, as the monk steps in many times throughout the narrative to do this. Could this be the White Bone Demon under one of its many disguises from chapter 27?
Number 5: A king or deity

Fig. 10 – (larger version)
On the right side, a figure riding a lion is depicted. On the left side, three figures that seem like they are servants are depicted, and in the back a building structure is carved. It seems to depict some group of royals or noblemen on Xuanzang’s way to India [fig. 10] (Yegŭrin Kŏnchʻuksa Samuso, 1993, p. 123).
The group of servants appear to me to be our pilgrims, the long-faced figure possibly being Pigsy. The figure riding the lion could be Manjusri and his feline mount. Could this be a reference to him subduing the beast in chapter 77? The figure’s hands appear to be producing bolts of lightning. I’m not sure of the significance, if any.
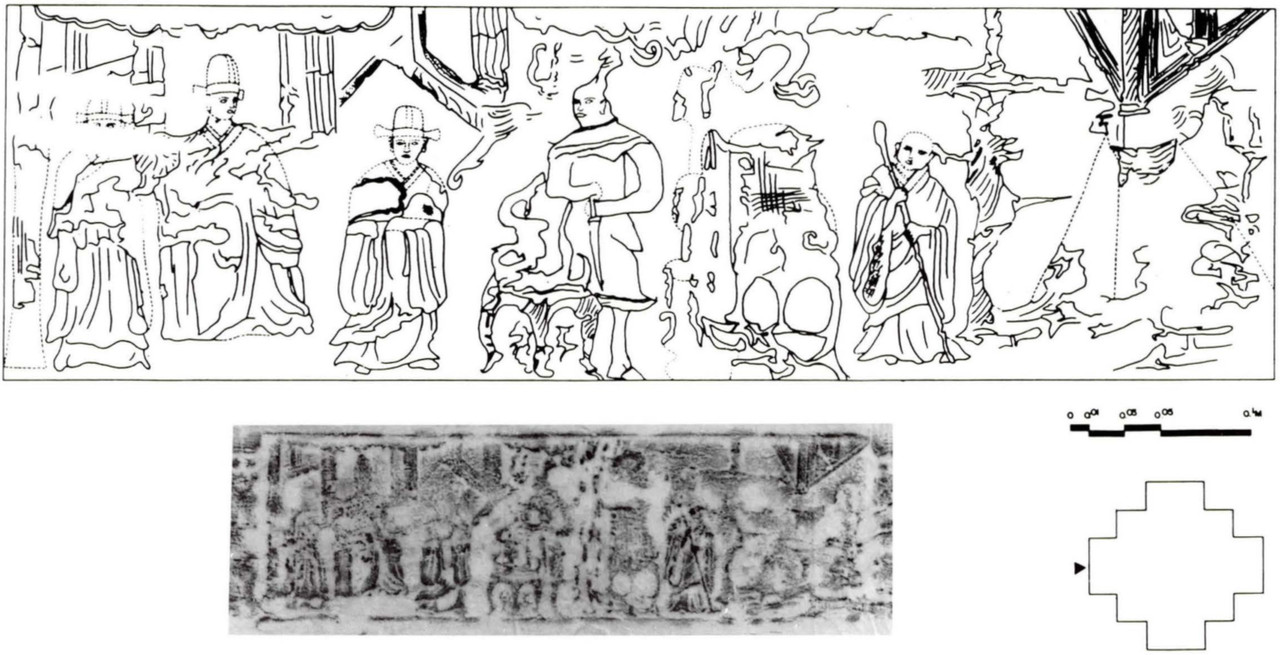
Number Six: A foreign court

Fig. 11 – (larger version)
On the right, there is a figure of a Buddhist monk holding a monk’s staff who seems to be Monk Xuanzang, and a figure to his left seems to be a disguised Monkey. On the left, figures of noblemen from a palace are portrayed. This appears to depict a scene where Monk Xuanzang’s travel party is welcomed in some palace along the road [fig. 11] (Yegŭrin Kŏnchʻuksa Samuso, 1993, p. 124).
The strange figure in the middle is a complete mystery to me. While the figure is identified as Monkey, it’s impossible to tell for sure.
Number Seven: Fire Mountain

Fig. 12 – (larger version)
On the left side, a pattern of fire sparks is carved. And in front of that is Monkey, holding a fan trying to put out the fire. Behind him Monk Xuanzang is carrying out some action with lifted hands, and behind him Zhu Bajie is holding the horse reins while Sha Wujing as always is carrying the knapsack. This depicts the scene of Xuanzang’s travel party meeting and trying to eliminate difficulties along the road [fig. 12] (Yegŭrin Kŏnchʻuksa Samuso, 1993, p. 124).
This is the least ambiguous of the twenty scenes and my personal favorite. It depicts Monkey using the magic palm leaf fan to conquer the flames of Fire Mountain.
Pigsy’s upraised hand-wide stride motif appears once more.
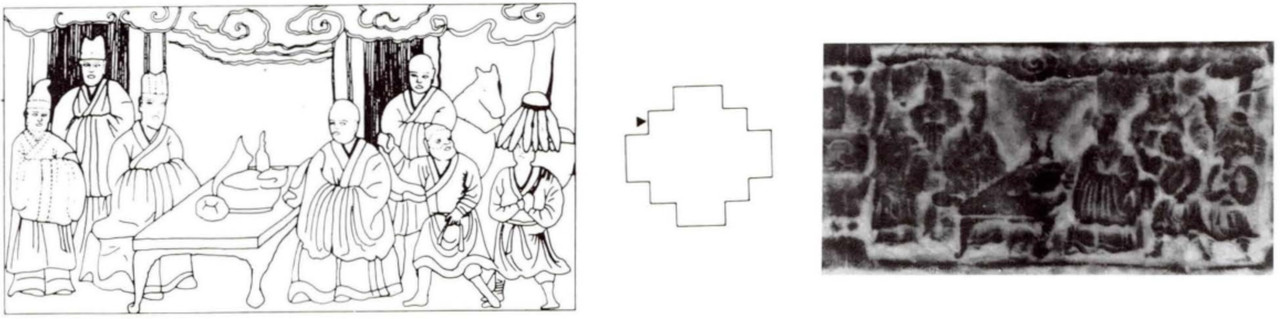
Number Eight: Offerings

Fig. 13 – (larger version)
A table is placed in the middle, and on top of it lays objects that seem to be offerings. On the right Xuanzang’s travel party and on the left figures of noblemen or royals are depicted. Two of the figures from Xuanzang’s travel party are covering their heads with something, but this seems to be to conceal the sight of Monkey and Zhu Bajie’s animal heads. This appears to be the scene of Xuanzang’s travel party receiving offerings from a royal or gentry family along the way [fig. 13] (Yegŭrin Kŏnchʻuksa Samuso, 1993, p. 124).
The bearded figure between Tripitaka and the supposedly veiled figure is no doubt Pigsy, based on his upraised hands and wide stride. The elongated snout has been confused for a beard.
Also, could the veil actually be supplies on the horse’s back? Maybe the original rubbing is degraded in this area, making the head look as if it is under (instead of in front of) the object.
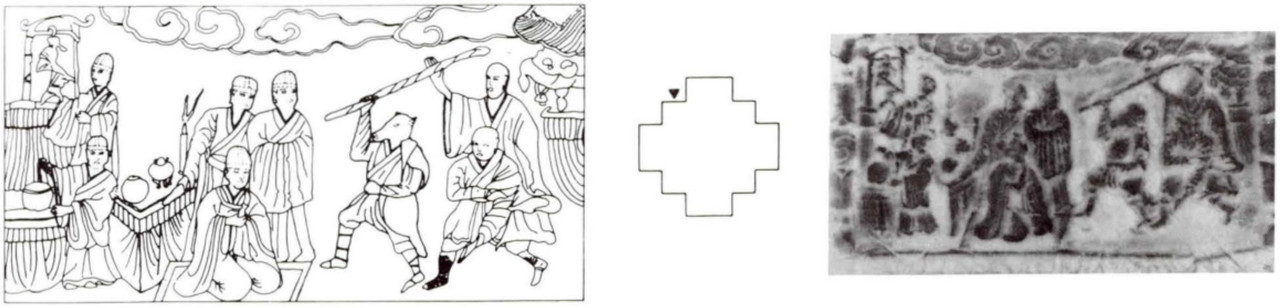
Number Nine: Another confrontation

Fig. 14 – (larger version)
On the left, a figure of a nobleman who is kneeling or bending his head is depicted. On the right, the figure of Zhu Bajie, who is trying to attack the nobleman, and the figure of Monk Xuanzang, who is trying to prevent this, are shown. It appears to be depicting some sort of misunderstanding that happened between the nobleman and Xuanzang’s attendant [fig. 14] (Yegŭrin Kŏnchʻuksa Samuso, 1993, p. 124).
Pigsy has not been portrayed with a weapon up to this point. It would make more sense if Monkey was wielding the staff. After all, figure 17 depicts Sun standing in a similar posture while wielding a club/staff. Perhaps the elongated face on this panel is just an artifact from the original rubbing?
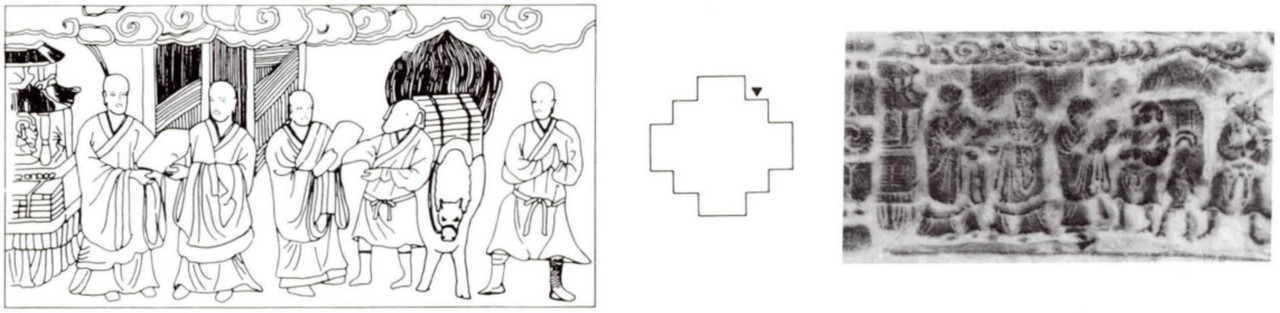
Number Ten: A temple

Fig. 15 – (larger version)
On the left side, Xuanzang bears a monk’s staff and his attendants are depicted together with the horse. And on the right side, symmetrical to this, are the figures of a Buddhist monk (holding a monk’s staff) and his attendant, who are about to receive Xuanzang’s travel party. This appears to depict the scene of Xuanzang’s travel party being welcomed by the monks of some temple along the way. Here Monkey and Zhu Bajie seem to have transformed into monks and are posing as Buddhist monks.
The above ten sides, beginning at due south and reaching due north, appear to be depicting the process of Xuanzang’s travel party going to India, while the ten sides starting at due north appears to depict their return journey [fig. 15] (Yegŭrin Kŏnchʻuksa Samuso, 1993, p. 124).
The scene shows the small monk on the right passing something to Tripitaka. Based on iconography from the following images (see, for example, fig. 18), this could be portraying the monks receiving the scriptures in India.
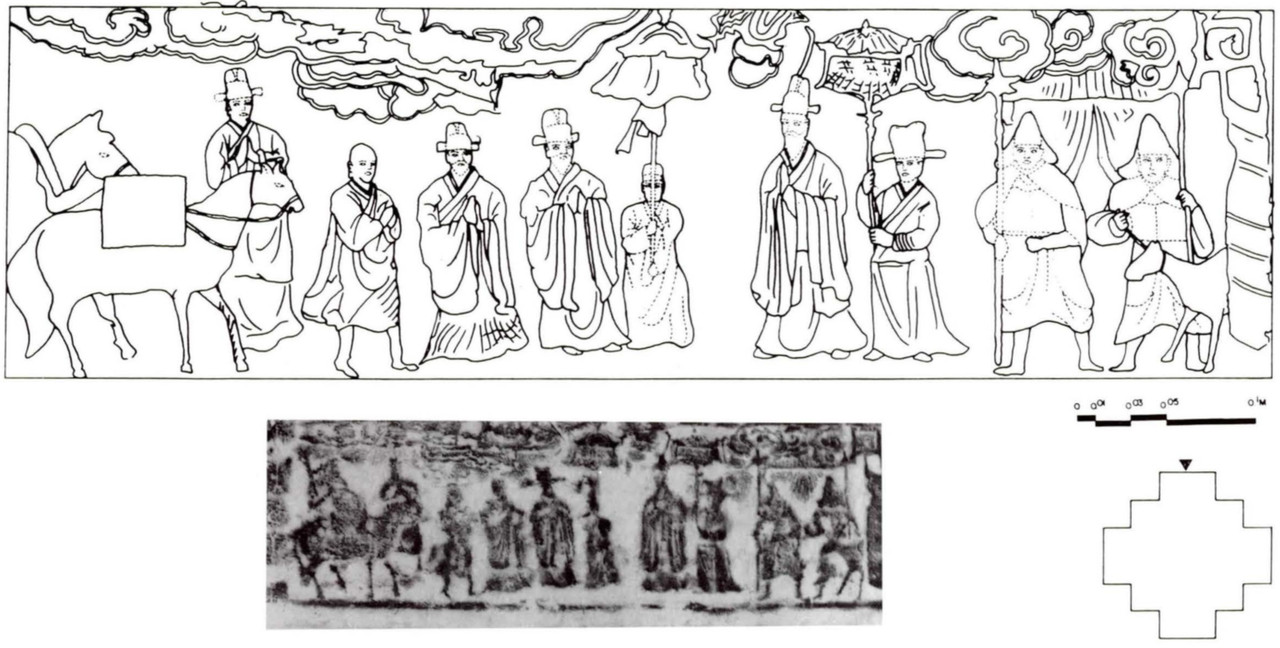
Number Eleven: Returning home

Fig. 16 – (larger version)
On the left side, two horses carrying something on their backs and Xuanzang’s travel party are shown. On the left are two figures of kings with umbrellas held over their heads by attendants. And to the left of them, a figure of an official who seems to be guarding the palace is visible. This appears to be depicting the scene where the kings are sending off Xuanzang’s travel party, who are setting off on their journey home after obtaining the scriptures [fig. 16] (Yegŭrin Kŏnchʻuksa Samuso, 1993, p. 124).
The “something” on the horses’ backs could be the scriptures.
Number Twelve: Saving their Master

Fig. 17 – (larger version)
On the left, the figure of a monk is caught by the figures of noblemen wearing crowns. On the left Monkey, Zhu Bajie, Sha Wujing and the horse are depicted. But Monkey and Zhu Bajie are assuming postures threatening to save the captured Monk Xuanzang. This seems to show the image of Monkey and company as guards, trying to save Xuanzang when he was being captured on their way back [fig. 17] (Yegŭrin Kŏnchʻuksa Samuso, 1993, p. 125).
Here the figure wielding the staff is designated Monkey, with Pigsy standing behind him. Again, this makes more sense than Zhu Bajie attacking (as portrayed in figure 14).
Number Thirteen: Passing on the dharma

Fig. 18 – (larger version)
On the right side, Xuanzang’s travel party and the horse carrying the scriptures are depicted. Here Xuanzang is shown handing over some of the Buddhist scriptures to the figure of a monk on the left. This appears to show Xuanzang’s travel party passing on Buddhism along the way on their return journey [fig. 18] (Yegŭrin Kŏnchʻuksa Samuso, 1993, p. 125).
Compare the shape of the Buddhist scriptures held by the monks with that in figure 15.
The panel draws on preexisting iconography regarding the sutras. The collection of holy writings are sometimes portrayed as a bundle of scrolls emitting an aura of holy light. See, for example, the 12th-century mural from Yulin Cave (Yulin ku, 榆林窟) number three in Gansu province, China (fig. 19).

Fig. 19 – Detail of sutras from a 12th-century Yunlin cave mural (left) and the sutras from panel thirteen (right) (larger version). Both are shown stacked atop a horse.
Number Fourteen: The emperor waits

Fig. 20 – (larger version)
In the middle of the right side, the figure of a king seated on a throne is depicted. On both sides of him figures of scholar-officials attend to him or sit. On the left, figures of officials are shown attending to duties or sitting. It seems this is depicting the scene of China’s emperor waiting for Xuanzang’s travel party [fig. 20] (Yegŭrin Kŏnchʻuksa Samuso, 1993, p. 125).
Could the figures at the table actually be our heroes, with Xuanzang kneeling before a foreign king?
Number Fifteen: An ascetic or Monkey

Fig. 21 – (larger version)
On the left side, a figure of an ascetic is depicted sitting under a tree (Bodhi tree) meditating, and Xuanzang’s travel party and the horse are depicted. Here Xuanzang is assuming a posture, holding the monk’s staff and lifting his right hand trying to assert something. This seems to show the scene of Xuanzang’s travel party meeting an ascetic and passing on Buddhism on their journey home [fig. 21] (Yegŭrin Kŏnchʻuksa Samuso, 1993, p. 125).
Look closely and you will notice that Sun Wukong does not appear in the scene. Could the “ascetic” be Monkey kneeling before Xuanzang. If so, could this be a reference to the immortal and his master mending their relationship in chapter 58 after the trickery of the Six-Eared Macaque forced them apart?
Number Sixteen: Imperial court

Fig. 22 – (larger version)
On the right, a building is depicted and inside it a figure of a king sitting on a throne, and in front of him, a figure of a kneeling monk (Xuanzang) are portrayed. Outside the building, the figure of a young monk that seems to be Xuanzang’s attendant is depicted. Behind him, figures that seem to be civil and military officials are depicted. This seems to show the scene of Xuanzang meeting some king along his way [fig. 22](Yegŭrin Kŏnchʻuksa Samuso, 1993, p. 125).
Could the “attendant” be Monkey?
Number Seventeen: Attacking a pagoda

Fig. 23 – (larger version)
On the left, a pagoda is depicted and in front of it, Zhu Bajie is carrying a club, assuming a posture trying to bring the pagoda down. Behind him Monk Xuanzang is lifting his right hand and insisting something, as if trying to stop him. This seems to show the soothing of Zhu Bajie’s aggressive, insulting actions towards Buddhism [fig. 23] (Yegŭrin Kŏnchʻuksa Samuso, 1993, p. 125).
Like figure 14, it would make more sense if Monkey is the one wielding the staff. Could this be a reference to chapter 62 when Sun captures two fish spirits found on a pagoda’s topmost floor?
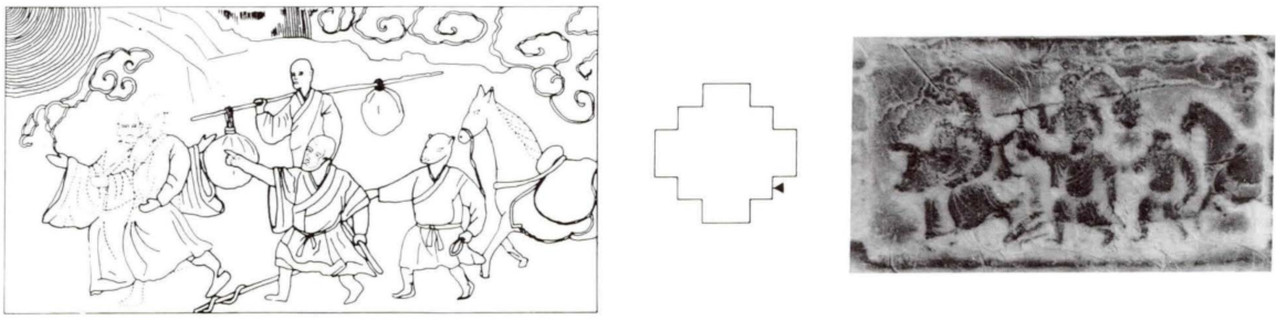
Number Eighteen: Nearing home

Fig. 24 – (larger version)
In the upper left part, the sun symbolizing light is depicted. Headed in that direction Monk Xuanzang is taking the lead and behind him Monkey, Zhu Bajie and Sha Wujing are shown hurrying their steps while leading the horse. Here Monk Xuanzang seems to be urging Monkey, Zhu Bajie and Sha Wujing, rushing their journey home [fig. 24] (Yegŭrin Kŏnchʻuksa Samuso, 1993, p. 125).
This includes Pigsy’s aforementioned motif. It is a better match for the ceramic pillow and incense burner examples from figure 19.
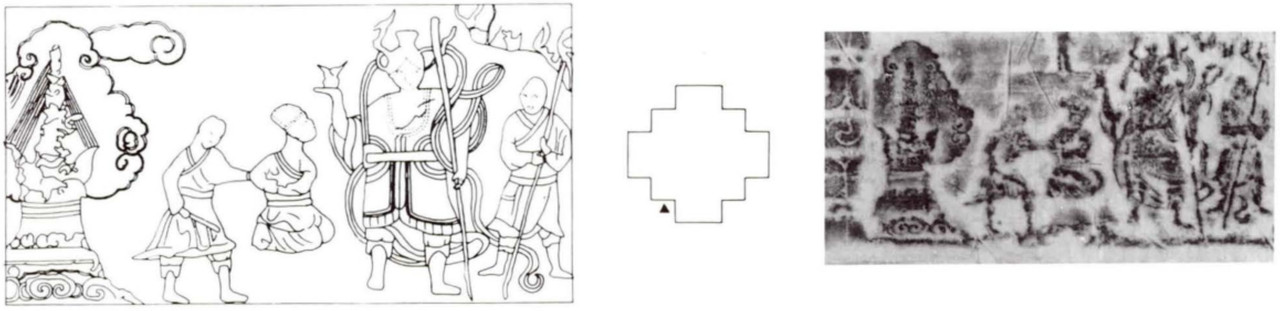
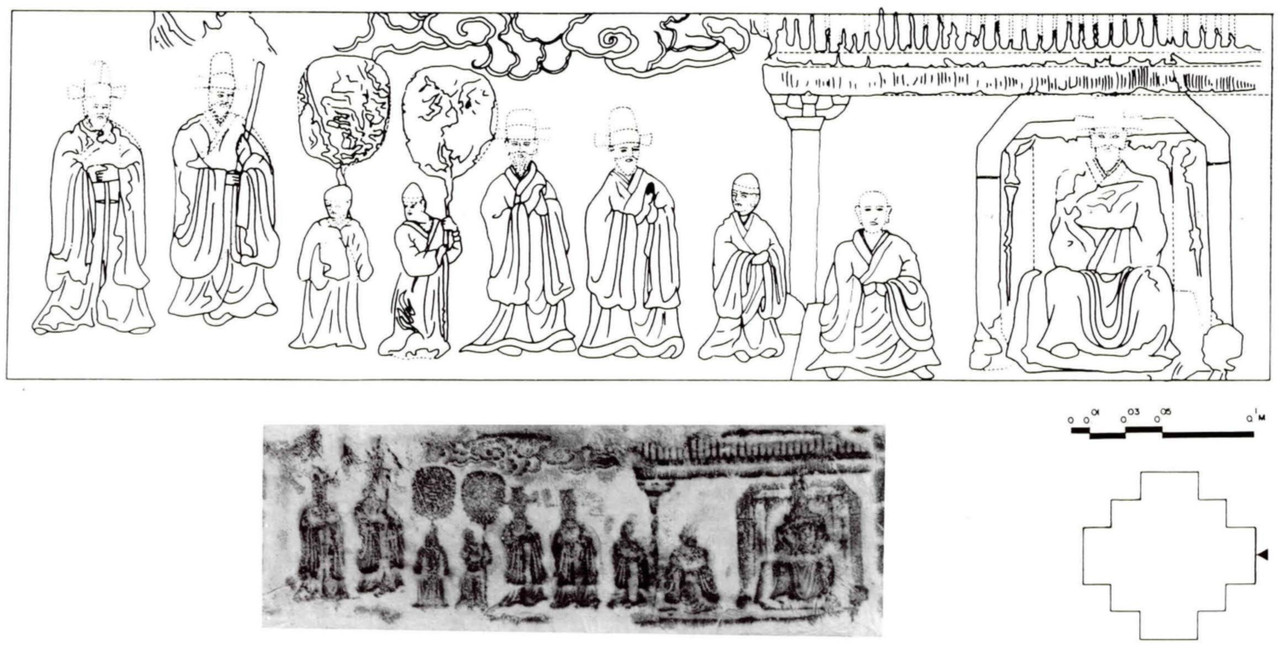
Number Nineteen: A deity appears

Fig. 25 – (larger version)
On the right, a figure of a celestial being is depicted and Xuanzang’s travel party is facing it symmetrically. This seems to show the fact that Xuanzang’s travel party received the blessing of celestial guardian deities [fig. 25] (Yegŭrin Kŏnchʻuksa Samuso, 1993, p. 126).
I’m confused as to why the two characters on the far right are stacked one on the other. Per the original ink rubbing, could “they” actually be a singular figure, possibly someone of great importance given their size? Could the “deity” actually be Xuanzang being elevated in spiritual rank like in chapter 100?
Number Twenty: Teaching the dharma

Fig. 26 – (larger version)
On the left, something that seems to be a Buddhist altar is depicted. In front of it, Xuanzang is placed in the middle shown holding the monk’s staff, and Monkey, Zhu Bajie and Sha Wujing are each shown performing different actions. Xuanzang is lifting his right hand, posed arguing something and you could say he is trying to educate his attendants, Monkey etc., in Buddhism [fig. 26] (Yegŭrin Kŏnchʻuksa Samuso, 1993, p. 126).
While the line drawing looks more like a figure at a desk, it very well could be an altar with a Buddha statue. Could this depict the lives of our heroes after entering paradise?
IV. Other Pagodas
This is not the first time characters from the story cycle have appeared on a pagoda. Even older examples appear on the 13th-century tower of the Kaiyuan Temple from Quanzhou, Fujian province, China. In this previous article I described how the pagoda is covered with eighty life-sized carvings of Buddhas, bodhisattvas, guardian deities, Buddhist saints, and eminent monks. Of note is a muscular, sword-wielding, monkey-headed warrior that many consider to be an early example of Sun Wukong. Another is an armored, spear-wielding warrior believed to be the dragon prince who becomes the white dragon horse. Both occupy the same face of the eight-sided structure (Dudbridge, 1970, pp. 47-48 and 49-51).
V. Conclusion
Zhu Bajie’s oldest known depictions come from a time coinciding with the late Yuan Dynasty, examples including a ceramic pillow and a fragmented incense burner from China and carvings on a pagoda from Korea. Built in 1348 by Goryeo representatives with ties to the Yuan court, the ten-story Gyeongcheonsa pagoda includes twenty Journey to the West-related scenes around the second level of the structure’s multifaceted three-tiered base. Many of the scenes are vague or focus more on kings and nobles in place of Tripitaka’s tribulations or instances of supernatural battles. One has to consider the story cycle was still solidifying at this point, so it’s possible some of the scenes depict episodes that did not make it into the final Ming version of the novel. But given the amount of royalty, is it possible the donors/planners were trying to ingratiate themselves with people of higher social rank? Or were they just trying to illustrate the great many countries visited by the pilgrims (each one ruled by a king) within the limited space provided?
The panels involving Pigsy for the most part use a consistent iconography borrowed from China. The aforementioned Yuan examples portray Pigsy leading the horse with one hand and with the other holding his signature rake, which rests on his shoulder, all while taking a large step forward. The pagoda panels, however, do not portray the rake, leaving our portly hero with his arm strangely floating in the air. Instead of a rake, some panels appear to show him wielding a staff. But the figure might actually be Sun Wukong, the elongated face just being an artifact from the original ink rubbings.
The fact that characters from the Journey to the West story cycle appear on Chinese and Korean pagodas alongside Buddhist deities proves just how intertwined the story is with the religion. The tale essentially symbolizes the quest for enlightenment, the ultimate goal of Buddhism. Therefore, such pictorial representations, especially the narrative-type scenes from Gyeongcheonsa, were probably meant to both entertain and spread the faith.
Update: 10-26-19
I have recently learned that the line drawings from Yegŭrin Kŏnchʻuksa Samuso (1993) are all but useless. A prime example is number nineteen. As a reminder, here is the drawing:

I originally suggested that the being on the cloud was Xuanzang being elevated in spiritual rank. I didn’t comment on the strange, flower-like cloud to the right of that figure because of its abstract shape.
Now here is a photo of the actual carving. It has been enhanced slightly for clarity.

You’ll noticed that the cloud really is a flower with a defined bulb, stem, and leaves. There also appears to be a figure sitting on the flower, one who is surrounded by what looks to be spikes or swords. Here’s a closer look with a crude line drawing by the author.

Wall (2019) notes the figure on the flower is Red Boy and the figure on the cloud is Guanyin (pp. 2129-2130), making this a depiction of the former’s defeat at the end of what would be chapter 42 of the Ming Journey to the West:
After she received [treasure swords borrowed from heaven], the Bodhisattva [Guanyin] threw them into the air as she recited a spell: the swords were transformed into a thousand-leaf lotus platform. Leaping up, the Bodhisattva sat solemnly in the middle.
[…]
[Sun Wukong feigns defeat and tricks Red Boy into chasing him to Guayin’s domain] When the monster spirit suddenly discovered that Pilgrim was gone, he walked up to the Bodhisattva with bulging eyes and said to her, “Are you the reinforcement Pilgrim Sun brought here?” The Bodhisattva did not reply. Rolling the lance in his hands, the monster king bellowed, “Hey! Are you the reinforcement Pilgrim Sun brought here?” Still the Bodhisattva did not reply. The monster-spirit lifted his lance and jabbed at the heart of the Bodhisattva, who at once changed herself into a beam of golden light and rose into the air. Pilgrim followed her on her way up and said to her, “Bodhisattva, you are trying to take advantage of me! The monster-spirit asked you several times. How could you pretend to be deaf and dumb and not make any noise at all? One blow of his lance, in fact, chased you away, and you have even left behind your lotus platform.”
“Don’t talk,” said the Bodhisattva, “let’s see what he will do.” At this time, Pilgrim and Mokṣa both stood in the air shoulder to shoulder and stared down; they found the monster-spirit laughing scornfully and saying to himself, “Brazen ape, you’re mistaken about me! What sort of person do you think that I, Holy Child, happen to be? For several times you could not prevail against me, and then you had to go and fetch some namby-pamby Bodhisattva. One blow of my lance now has made her vanish completely. Moreover, she has even left the treasure lotus platform behind. Well, let me get up there and take a seat.” Dear monster-spirit. He imitated the Bodhisattva by sitting in the middle of the platform with hands and legs folded. When he saw this, Pilgrim said, “Fine! Fine! Fine! This lotus platform has been given to someone else!”
“Wukong,” said the Bodhisattva, “what are you mumbling again?”
“Mumbling what? Mumbling what?” replied Pilgrim. “I’m saying that the lotus platform has been given to someone else. Look! It’s underneath his thighs. You think he’s going to return it to you?”
“I wanted him to sit there,” said the Bodhisattva.
“Well, he’s smaller than you,” said Pilgrim, “and it seems that the seat fits him even better than it fits you.”
“Stop talking,” said the Bodhisattva, “and watch the dharma power.”
She pointed the willow twig downward and cried, “Withdraw!” All at once, flowers and leaves vanished from the lotus platform and the auspicious luminosity dispersed entirely. The monster king, you see, was sitting actually on the points of those swords. The Bodhisattva then gave this command to Mokṣa:
“Use your demon-routing cudgel and strike back and forth at the sword handles.”
Dropping from the clouds, Mokṣa wielded his cudgel as if he were demolishing a wall: he struck at the handles hundreds of times. As for that monster-spirit,
Both his legs were pierced till the points stuck out;
Blood spouted in pools as flesh and skin were torn.Marvelous monster! Look at him! Gritting his teeth to bear the pain, he abandoned the lance so that he could use both hands to try to pull the swords out from his body (Wu & Yu, 2012, vol. 2, pp. 246 and 249-250).
Could the figures, one on top of the other’s shoulders, be an inventive way of showing Monkey and Guanyin’s disciple Moksha working together to subdue Red Boy?
This carving shows the Red Boy episode was known in Korea during the 14th-century, demonstrating that it predates the final Ming novel by centuries. The tale obviously would have taken time to form, become established in the accepted story cycle, and travel north, suggesting it may date to the early part of the corresponding Yuan-period when the Pagoda was raised in Korea, or possibly even before.
I hope to locate pictures of the other carvings to make this article more accurate.
Notes:
1) See Dudbridge, 1970, pp. 60-74 for more information. The tale itself is translated in appendix B of the same work. See pages 179-188.
2) I am indebted to Sini Henningsen, BA (sinihenningsen@gmail.com) for translating the cited Korean material.
Sources:
Brose, B. (2018). The pig and the prostitute: The cult of Zhu Bajie in modern Taiwan. Journal of Chinese Religions, 46 (2), pp. 167-196, DOI:
10.1080/0737769X.2018.1507091
Dudbridge, G. (1970). The Hsi-yu chi: A study of antecedents to the sixteenth-century Chinese novel. Cambridge: Cambridge Univ. Press.
Ten-story Stone Pagoda from Gyeongcheonsa Temple. (n.d.). Retrieved January 23, 2019, from https://www.museum.go.kr/site/eng/relic/masterpiece/view?relicMpId=11
Wall, B. (2019). Dynamic texts as hotbeds for transmedia storytelling: A case study of the story universe of the Journey to the West. International Journal of Communication 13, 2116-2142. Retrieved from https://ijoc.org/index.php/ijoc/article/view/10006/2648
Yegŭrin Kŏnchʻuksa Samuso 예그린 건축사사무소. (1993). Wŏn′gaksaji sipch′ŭng sŏkt′ap: silch′ŭk chosa pogosŏ 圓覺寺址十層石塔: 實測調查報告書. Seoul: Munhwajae Kwalliguk.